
Publish a new article
Create the content with Word
Firstly, the content is edited in Word. The following rules must be observed:
- The standardised Word templates for paragraphs must be used so that the formatting can be adopted. To do this, activate the arrow at the bottom right of the “Styles” field in the “Start” menu.
- However, WordPress does not adopt the formatting settings from Word, but only assigns the paragraph styles. A Word paragraph “header 1” becomes a WordPress paragraph “H1” with the properties of the paragraph “H1”. Spaces, text sizes etc. must therefore be adjusted in the WordPress editor if necessary.
- All content in WordPress is located in so-called blocks, comparable to paragraphs in Word. To ensure that posts can be displayed on smartphones, WordPress arranges the blocks one below the other, even if they are next to each other in the layout. The blocks are arranged starting from the left.
- If possible, images should be at the end of the post. On smartphones in particular, it is more pleasant to read when texts are displayed in one continuous block. It can therefore make sense to add images in the WordPress editor first, as they have to be explicitly uploaded in the editor anyway. If there are images in the Word text, only placeholders are inserted in WordPress, not the image itself.
- Images that flow around text are possible, but can look a little unsightly on smartphones as the images are left- or right-aligned.
Add a new post
Add a new post in the WordPress dashboard under Posts. A new window appears for the post. However, the post still needs to be adapted to the layout of the posts on this website. For this purpose, there is a template for posts that must be added to the new post. There is a field on the right-hand side of the editor window that can be used to set the properties.
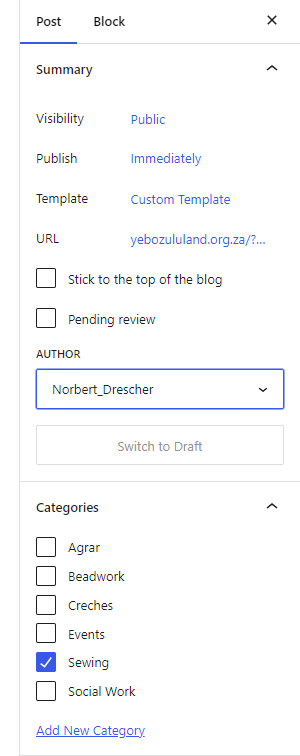
The template must be set. To do this, click on the Template entry and replace the default template with the „Post Template“. The template is used to set the background colour and text width of the entry. The creation or last modification date is also inserted.
WordPress allows categories to be assigned to each post. Filter options are realised via the category. For example, you can display all posts in a category. Multiple entries are possible. If a new category is to be introduced, click on the link accordingly.
After setting the general post properties, each post must be given a name. To do this, enter the page title at the top.
The post now has the default background colour and the default width. If a different width is to be used, a group block must be added to set a new width. All content that is to comply with this width must be in this group. To do this, activate the plus sign at the top right. The block selection then opens. Scroll down a little until the “Group” block appears and activate it.
You can view the document structure in the structure window. To do this, activate the symbol with the three lines. The document structure opens, showing all the blocks added so far. If you want to change the properties of a block, you must select the block. This opens the block’s properties window on the right-hand side. You can also move the blocks in the document structure as required.
Add text
To do this, copy the text from the Word file and paste it into the article. If the standard paragraph styles have been used, WordPress converts these into the blocks that correspond to the paragraph styles.
Add images
There is an “Image” block that must be used for this purpose. This asks whether an image should be selected from the media centre or whether the image should be uploaded to the media centre first.
If images are to be inserted next to each other, a column block must first be inserted, whereby each column is assigned an image block. In the column block, you can set whether images should be arranged horizontally or vertically on mobile devices.
Inserting links to documents
PDF documents can be inserted directly via the “File” block or via a link. For many documents and for display on a mobile device, it is generally better to use links to select the documents that a user wants to view. To do this, insert a paragraph with the text of the link. Select it and activate the link symbol.

After activation, you will be asked to enter a URL. To do this, first load the document into the media centre. Select the document and activate it. In a new window, you can copy the URL. Enter this copy in the URL field of the link.
Insert a new gallery
The nextGEN Galery plugin is used to manage the galleries. Adding a new gallery is done in two steps:
- Create a new gallery: To do this, assign a name and upload the desired images to the gallery.
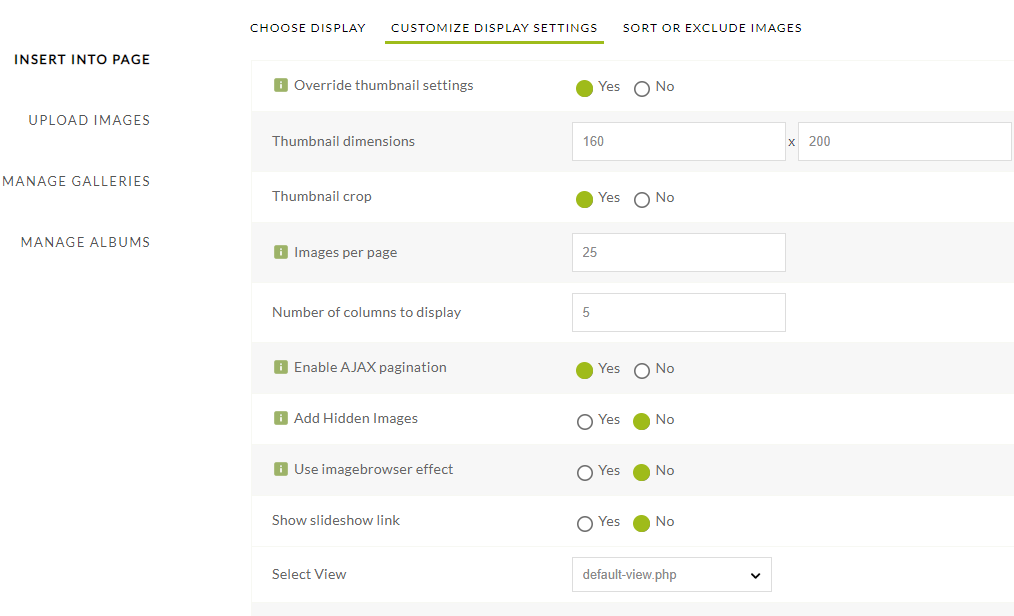
- Assign the gallery to a page: To do this, insert a nextGEN gallery block and add the previously created gallery to this block. Make the following settings or change entries if necessary.
Due to limited space on the server and to allow fast downloads, pictures should not exceed 600 – 700 KByte. To reduce the size of pictures, for example the application “irfanview” (https://www.irfanview.de/) helps. Load pictures into the application and store it with a reduced size. In addition, you can crop pictures or enhance pictures, if for example pictures are too dark.